In this third tutorial on Making Comics with GIMP, we’ll cover how to make speech bubbles. Speech bubbles are an essential part of comics, and come in a variety of shapes and styles, most of which can be achieved with this relatively simple technique. We’ll be using the same ‘Paths Tool’ which we used in the previous tutorial, on how to make Panels and Gutters, but this time around we’ll be be using them to create speech bubbles.
Getting Started
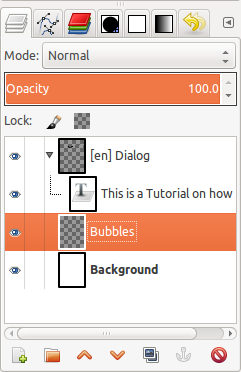
The first thing we need to do is to create some text to draw our speech bubble around. Use the ‘Text Tool’, and drag out a an area for the text on your page, and enter some text into it. The text tool creates a new layer for each text element, so it’s a good idea to group all the text elements on a page, in a ‘Layer Group’. Simply hit the folder icon at the bottom of the layer dialog, give your layer group a name, and drag the text layer, onto the new layer group.
Finally, you’ll need a layer for drawing the speech bubbles on, so create a new layer with a transparent background, and call it Bubbles. Place this layer below the layer group containing the text.
Drawing the Speech Bubble
We’ll be using the ‘Paths Tool’ to draw up the bubble. Normally, I would have a rough pencil sketch of where I want the balloon, but it doesn’t really matter, as using the ‘Paths Tool’, you can easily tweak the size and shape of your balloon after you’ve drawn it up.
The ‘Paths Tool’ uses bezier curves to define shapes. It’s a bit like connecting dots, but at each dots there are handles that define the curvature of the line, adjusting the tension at each point. The shorter the handles are, the sharper the curvature. The direction of the handles also affects the direction of the curve. If you click and drag when using the ‘Paths Tool’, these handles are dragged out, and the curvature becomes smoother. Conversely, if you just click, the handles will have zero length, and thus the line will have a sharp corner.
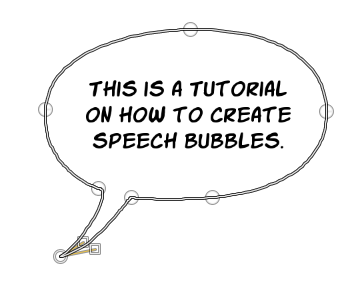
To draw our first speech bubble, start by clicking at the very tip of the tail of the bubble, and then where the tail connects with the bubble. When you get to the side of the bubble, click and drag to make those points smooth, and continue like this around the bubble. Finally when you reach the tip of the tail again, hold down Ctrl, and click it, to close the curve.

You’ll notice that my speech bubble here is a bit lopsided, and not very even. So the next thing we need to do is to tweak the shape of it, to make it nice and even. Using the ‘Paths Tool’ you can click on each of the points, and move them about. If you select a point, it’s bezier handles will become visible. You can click and drag these, to adjust the curvature. Hold down Shift, when moving the bezier handles, to move it equally on both sides of a point.
If you click the line itself, you can drag it around too. This is a good way to get a hold of bezier handles at sharp corners, that are otherwise invisible, such as for creating a nice curve for the tail. If you accidentally click outside the curve when editing it, you’ll get a new point, simply hit Ctrl-z, to undo and thus remove it. After some quick tweaking of the bezier handles and points, we have a nice round speech bubble.
Making the Speech Bubble Visible
The path we’ve drawn out, is only visible in GIMP, and not when you export the comic to other file formats, so the next thing we need to draw it to the ‘Bubbles’ layer. In the ‘Layers’ dialog, select the ‘Bubbles’ layer we created earlier, as that is the layer we want to draw our speech bubbles on. Then go to the ‘Paths’ dialog (Windows>Dockable Dialogs>Paths), and select the new Unnamed path we just created, rename it to ‘Bubble Paths’ and make it visible.
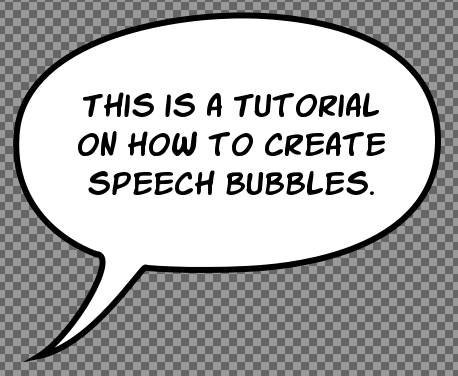
The first thing we want to do, is fill the bubble with white. This is so it will cover up any art underneath it. To do this, right click the ‘Bubble Paths’ in the ‘Paths’ dialog, and choose ‘Path to Selection’. Set the background color to white, and choose, Edit>Fill with BG Color from the menu.
Next we want to draw the outline. Begin by deselecting the current selection, Select>None (Shift-Ctrl-a), and setting the foreground color to black. Then right click the ‘Bubble Paths’ in the ‘Paths’ dialog, and choose ‘Stroke Path’. Choose the ‘Line width’ you would like, and hit ‘Stroke’. This will draw a nice outline around our speech bubble, and that’s pretty much it.
Note that when creating multiple speech bubbles on a page, you can add more paths to the same ‘Bubble Paths’, so you only need to do the filling and stroking once, for all the speech bubbles on the page.
Getting Creative with Speech Bubbles
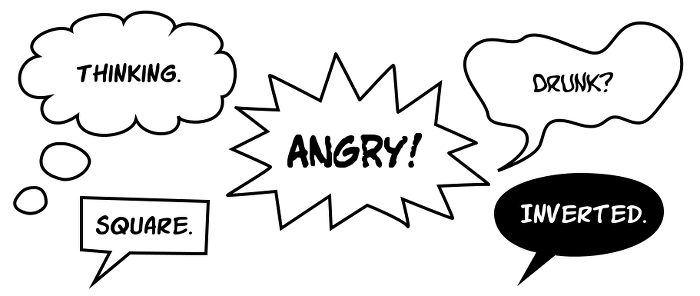
The speech bubble we just created is a pretty standard speech bubble, there is nothing stopping you from getting creative with this technique. You can use the ‘Paths Tool’ to draw any shape you like, and you can fill the bubbles with color or texture, or even make them semi transparent. If you look in the ‘Stroke Path’ dialog, you’ll see there are lots of options, including using the currently selected paintbrush to draw the outline of you speech bubble for some creative looking speech bubbles. Here are some sample speech bubbles I threw together quickly.
The only remaining thing for you to do now, is to get to work on that comic book of yours…which is probably what I should be doing too.

